🎉 CX Elevate: Date Time Picker is available now on Shopify app store
Shopify app store


Owning a business has long been one of the most reliable paths to financial freedom. Today, countless entrepreneurs are finding success in ecommerce—and if you’re ready to take the leap, the first step is learning how to launch your Shopify store.
Shopify isn’t the only ecommerce platform available—alternatives like BigCommerce, Wix, and Squarespace exist—but Shopify stands apart. With its vast ecosystem of apps, themes, partners, and a thriving community of over 2.4 million active merchants (source: StoreLeads), Shopify has become the leading choice for both first-time entrepreneurs and established global brands.
That said, one of the biggest early challenges for new store owners is getting the launch process right. This guide will walk you through the 12 essential steps to build your store properly, along with proven success tips to help you grow with confidence.
Shopify is a user-friendly ecommerce website builder designed to make launching an online store simple, even for beginners. At the same time, it’s powerful enough to support enterprise-level businesses with advanced, complex needs.
Some of the world’s top brands—including Gymshark, Spanx, and Allbirds—use Shopify to power their stores. Whether you’re starting a small side hustle or building the next big brand, Shopify can scale with you.

According to StoreLeads, Shopify is the largest all-in-one ecommerce platform, powering over 2.4 million live stores. By comparison:
1. Wix: 700,000+ stores
2. Squarespace: 300,000+ stores
3. BigCommerce: 44,000+ stores
The difference isn’t just in numbers. Shopify offers an unmatched ecosystem of experts, affiliates, and learning resources, making it easier for new merchants to get started and find support at every stage.
Most importantly, the Shopify App Store hosts over 13,000 apps—the largest ecommerce app marketplace in the world. By contrast, Wix currently offers around 500 apps. This flexibility allows merchants in every niche to find tools tailored to their business.
When you choose Shopify, you gain access to:
- 13,000+ apps to optimize and grow your store in any niche
(free and paid) designed for high performance
200+ professional themes
- A wealth of official and community-driven resources to guide you
- 24/7 live chat support for instant assistance
- An exclusive directory of Shopify experts for advanced needs
- A robust infrastructure with 99.99% uptime, ensuring your store stays open and selling every day

Here’s a breakdown of Shopify’s pricing plans:
- Basic Plan: $29/month (annual) or $39/month (monthly) — Ideal for beginners starting small.
- Shopify Plan: $79/month (annual) or $105/month (monthly) — Best for growing stores with steady sales.
- Advanced Plan: $299/month (annual) or $399/month (monthly) — Designed for scaling businesses.
- Shopify Plus: $2,300/month — Tailored for enterprise-level operations.
If you’re testing the waters with a lean setup, the Basic Plan ($39/month) paired with free apps and themes is more than enough.
- Free Shopify themes are modern, mobile-optimized, and include all the core ecommerce features.
- Many paid apps also offer free plans that cover the essentials for new store owners.
This setup is perfect for solo entrepreneurs who want to keep costs low without sacrificing professionalism. A “small” Shopify store can still look polished and fully functional from day one.
As your business grows, you may want to invest in premium themes and apps for more advanced features.
- Paid themes typically range from $140–$450. Price doesn’t always equal quality—many themes in the $200–$300 range offer an excellent balance of design and features.
Example: The Shine theme ($210) delivers features comparable to the popular Prestige theme ($380) at a lower cost.
- Apps vary widely in pricing depending on what you need—email marketing, upsells, subscriptions, etc. The good news: you don’t need apps to start selling. Add them only when they provide real value.
👉 Estimated setup for a premium store:
- $210 one-time payment for a quality theme
- $39/month for the Basic Plan
- Plus any additional monthly costs for paid apps
The truth is—you don’t need to be a tech expert or have everything “perfect” before you start. Here’s what actually matters:
✅ A product idea (even just one is enough to begin)
✅ Basic computer skills (if you can use Facebook, you can use Shopify)
✅ 10–15 hours (a weekend is enough to set everything up)
✅ $30–50 to invest (covers trial, first month, and a domain name)
✅ Product photos (smartphone shots work fine at first)
📋 Business name & logo (Shopify’s free tools can help you create both)
📋 Business registration (not always required upfront)
📋 Professional email address (upgrade later—Gmail works fine now)
📋 Social media accounts (can be set up after launch)
“I’m not technical” → Shopify’s drag-and-drop builder is as easy as using digital Legos.
“I don’t have inventory” → Start with dropshipping or print-on-demand—no stock required.
“I don’t have much money” → Many stores launched with under $100. Start lean and reinvest profits.
“I don’t have a business plan” → You’ll learn faster by doing. Launch now, refine later.
“What if I fail?” → Shopify has no long-term contracts. You can pause or cancel anytime. The only real failure is not starting.
Every successful store, whether physical or digital, starts with a solid foundation. Rushing this phase is like building a house on sand. Before you even sign up for a Shopify trial, you need to lay the groundwork. These are the critical first steps that many beginner Shopify guides gloss over, but they are essential for long-term success.
A great product isn't enough; you need a great market. Your first task is to move from a broad idea to a specific, defensible niche. This focus will be your superpower, allowing you to speak directly to a core audience instead of shouting into the void.

Your Action Plan:
- Niche Down: Your initial instinct might be to appeal to everyone, but specificity wins in e-commerce. Instead of "clothing," think "vintage band t-shirts from the 90s." Instead of "coffee," think "single-origin organic coffee from Colombia for espresso lovers." A clear niche makes your marketing infinitely easier.
- Validate Demand: An idea is just an idea until you have proof that people want to buy it. Use free tools like Google Keyword Planner and Google Trends to see if there is active search volume for your product ideas. Scour social media platforms like Instagram, TikTok, and Reddit to see if vibrant communities exist around your niche.
- Test the Waters: Don't be afraid to get direct feedback before you invest a dollar. Create a simple survey using Google Forms and send it to people in your target demographic. Ask them what they like, what they don't like, and what they'd be willing to pay. This early feedback is invaluable.
Next, you need to decide how you will source and handle your products. This decision will have a major impact on your startup costs, daily workload, and potential profit margins.
Your Action Plan: Understand the main options to determine which fits your budget and goals.
- Dropshipping: This model has the lowest upfront cost, as you don't purchase any inventory. When a customer places an order, you forward it to a third-party supplier who ships the product directly to the customer. It's an excellent way to test product ideas with minimal financial risk, but it comes with lower profit margins and less control over shipping and quality.
- Private Label / Handmade: This model offers the highest control over your product quality, branding, and customer experience, leading to higher profit margins. However, it requires a significant upfront investment in bulk inventory or raw materials.
- Print-on-Demand: This is a fantastic middle ground for artists and designers. You create designs that are printed on products like t-shirts, mugs, and posters only when an order is placed. There's no inventory to manage, and the creative control is all yours.
Your brand name is your first impression. It should be memorable, easy to spell, and reflect the essence of what you sell.
Your Action Plan:
- Brainstorm: Make a list of 10-15 potential names. Say them out loud. Are they easy to remember?
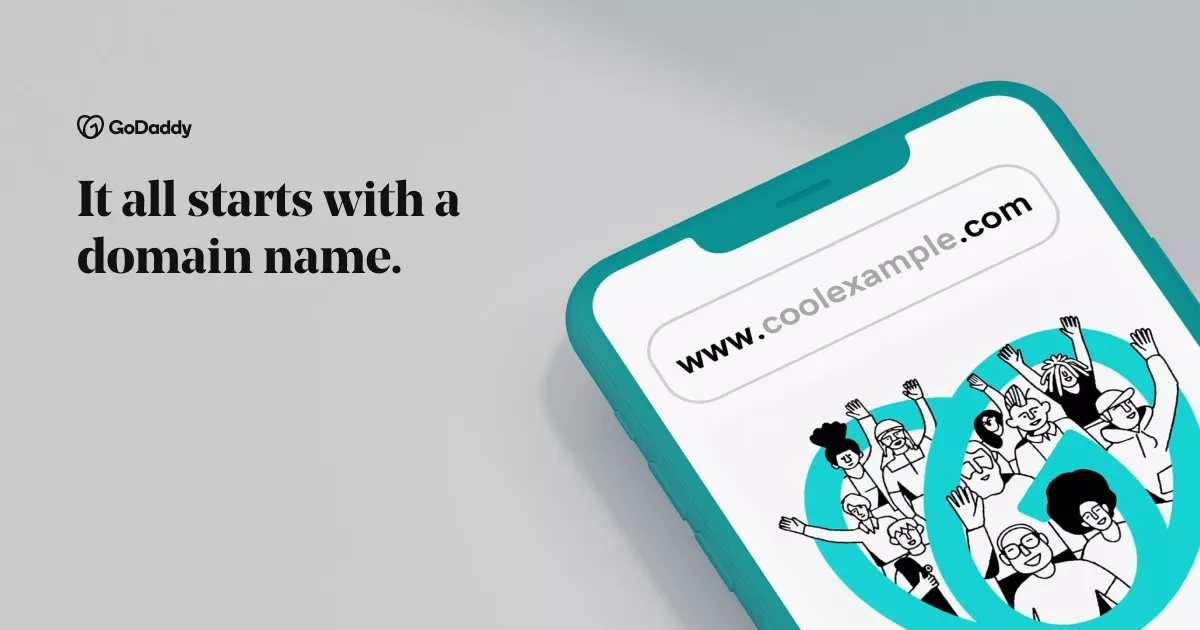
- Check Availability: Before you fall in love with a name, check if the .com domain is available. This is crucial for long-term brand credibility. You can check this directly on Shopify or through domain registrars like GoDaddy. Also, check if the name is available as a handle on your primary social media platforms.
- Keep it Simple: Avoid hyphens, numbers, and words that are difficult to spell. The easier it is for a customer to type your URL from memory, the better.
With your blueprint finalized, it's time to start building. This is the exciting part where your vision begins to take digital form. The following steps are the core of most practical Shopify guides.
Shopify's user-friendly nature starts with its sign-up process. They offer a free trial, which gives you ample time to build and polish your store before committing to a paid plan.
Your Action Plan: Start your free trial. Once inside, don't rush to add products. Spend at least an hour familiarizing yourself with the Shopify Dashboard. Understand that the left-hand menu is your command center: Orders is where you'll manage sales, Products is your inventory system, Customers is your CRM, and Online Store is where you'll control the look and feel of your site.
Your Shopify theme is the architecture and interior design of your digital boutique. It dictates the layout, style, and shopping experience.

Your Action Plan:
- Start with a Free Theme: You do not need an expensive premium theme to launch a successful store. Shopify's free themes (like Dawn, Sense, and Craft) are professionally designed, mobile-responsive, incredibly fast, and highly customizable.
- Focus on High-Quality Visuals: Your logo, banners, and product photography are what will bring your theme to life. A free theme with stunning visuals will always outperform an expensive theme with poor imagery.
- Use the Theme Customizer: This is your no-code design studio. Go section by section to upload your logo, set your brand's color palette and fonts, and customize the layout of your homepage to tell your brand story and showcase your best products.
This is where you stock your digital shelves. A great product page is your 24/7 salesperson, working tirelessly to convert visitors into customers. This is one of the most vital areas covered in our Shopify guides.
Your Action Plan:
- Write Compelling Descriptions: Don't just list features; sell benefits and outcomes. How will your product make your customer's life better or make them feel? Use a simple formula: a captivating hook, a bulleted list of key features, a paragraph on the benefits, and social proof like a customer testimonial.
- Take Great Photos: You don't need a professional studio. A modern smartphone, a source of bright, natural light (like a window), and a clean background are all you need to take crisp, clear product photos. Be sure to capture multiple angles, a lifestyle shot (the product in use), and a detail shot.
- Set Strategic Prices: Your pricing should not be arbitrary. Calculate your COGS (Cost of Goods Sold), factor in expenses like shipping and marketing fees, and then add your desired profit margin. Research competitors to ensure your pricing is competitive within your niche.
To build trust and provide a complete experience, your store needs a few essential pages beyond your homepage and product listings.
Your Action Plan: Before you launch, make sure you have created these five pages:
- About Us: Tell your story. Why did you start this business? What is your mission? People connect with purpose-driven brands.
- Contact Us: Make it incredibly easy for customers to ask questions. Include an email address, a contact form, and links to your social media.
- FAQ (Frequently Asked Questions): Proactively answer the most common questions about your products, shipping, and policies. This builds confidence and reduces your customer service workload.
- Shipping & Returns Policy: Be transparent and clear about your shipping costs, delivery times, and return procedures. This is one of the first pages a savvy online shopper will look for.
- Privacy Policy & Terms of Service: These legal pages are essential for protecting your business. Shopify provides helpful templates that you can use as a starting point.
This is the "back office" work—the less glamorous but absolutely critical part of setting up your store. Getting these details right is what separates professional operations from amateur mistakes.
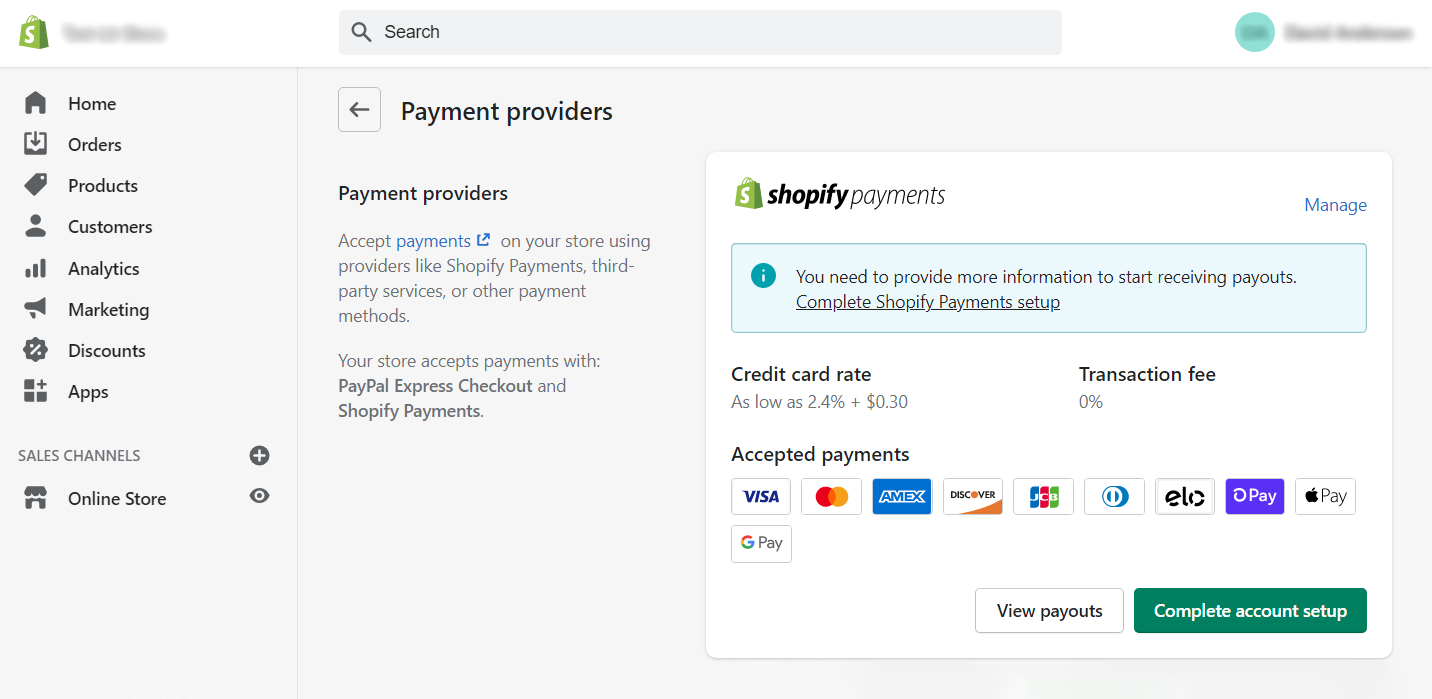
You can't make money if you can't get paid. Fortunately, Shopify makes this incredibly simple.
Your Action Plan:
- Activate Shopify Payments: Navigate to Settings > Payments. This is Shopify's native payment processor and the easiest way to start accepting all major credit cards.
- Enable Accelerated Checkouts: In the same section, ensure that accelerated checkout options like Shop Pay, PayPal, and Google Pay are enabled. These one-click payment methods are proven to dramatically improve conversion rates, especially for mobile shoppers.
Shipping can seem complex, but Shopify provides powerful tools to create a strategy that works for your business.
Your Action Plan: Navigate to Settings > Shipping and delivery and choose a strategy.
- Free Shipping: A powerful marketing tool to reduce cart abandonment. You can offer it on all orders or set a minimum spend threshold (e.g., "Free Shipping on Orders Over $75") to encourage larger purchases.
- Flat-Rate Shipping: The simplest option. Charge one fixed price for all domestic orders, regardless of weight or location.
- Calculated Shipping: Let Shopify and carriers like USPS or UPS calculate the exact shipping cost in real-time based on the customer's location and the weight of the items in their cart.
This is the step that intimidates most new entrepreneurs. You do not need to be a tax expert to get started.
Your Action Plan: Go to Settings > Taxes and duties. For US-based businesses, Shopify's tools can automatically handle the complex calculations for sales tax. You simply need to configure where you have a "tax nexus" (typically, the state where your business is based), and Shopify will apply the correct tax rates at checkout based on the customer's shipping address. As your business grows, it is always recommended to consult with a tax professional.
Your store is built, stocked, and wired for business. You're almost ready to open your doors.
Before you announce your store to the world, run through a final quality control check.Your Action Plan:
- Place a full test order on your store. Use a 100% discount code so it doesn't cost you anything. Test the entire flow from adding to cart to the order confirmation email.
- Proofread every single page. Ask a friend with a good eye for detail to do the same. Typos can erode trust.
- Check your site's appearance and functionality on both a desktop computer and a mobile phone.
- Ensure you have installed Google Analytics and a Meta Pixel (for Facebook/Instagram) to track your traffic from the very first day.
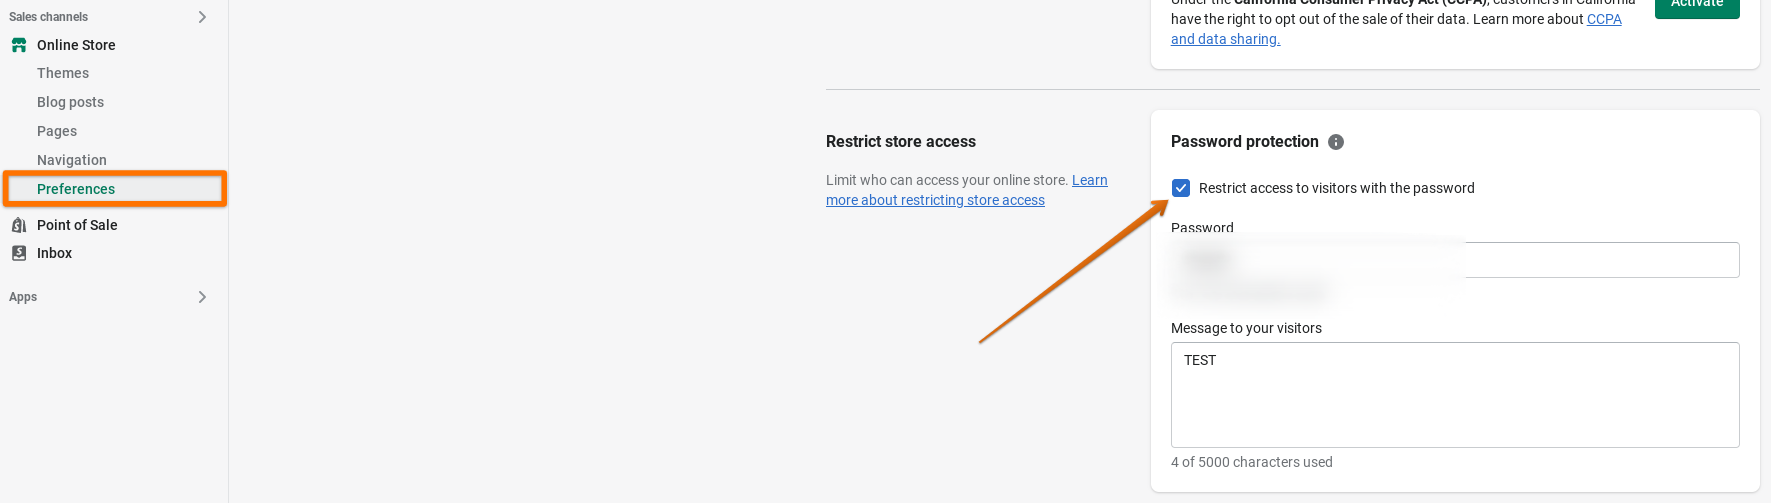
This is the moment. It's time to remove the password protection and open your digital doors to the public.
Your Action Plan: Navigate to Online Store > Preferences. Scroll down to the "Password protection" section, uncheck the "Enable password" box, and click "Save." Congratulations, you are now an official e-commerce entrepreneur.
Building a business from a simple idea is one of the most rewarding challenges you can undertake. By following this blueprint, you have methodically moved from a simple concept to a fully functional, professional online store ready for business.
You now have the plan. The path from dreamer to business owner is no longer a fog of uncertainty; it's a clear, step-by-step process. There will be challenges along the way, but you are now equipped with the knowledge to face them. As with all great Shopify guides, the goal is to empower you to take action.
The only thing separating your brilliant idea from a real, living business is that first step. Take it today.
We try to make easy and simple for every professionals. Get 30 days free trial - No credit card required.
